Tuesday, 8 September 2009

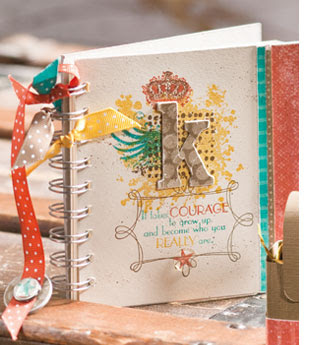
Courage Journal


Courage Journal

Stamps

* Extreme Elements
(set of 6; item 115181; $35.95)
* Gallery
(set of 3; item 113776; $30.95)
* Hope Happens
(set of 5; item 113722; $26.95)

Paper

* Naturals Ivory card stock: 1-1/2" x 1-1/2"; 5-1/4" x 5-1/4"
* Bermuda Bay Patterns Designer Series paper: 1/8" x 5-1/4"
* Dusty Durango Patterns Designer Series paper: 1-1/4" x 5-1/4"
* The Write Stuff Specialty Designer Series paper: 1-1/4" x 1-1/4"; 3" x 3" (monogram*); 5-1/4" long strip
* On Board 5" x 5" Art Journal
* On Board Loads of Letters
* On Board Essentials

Ink

* Bermuda Bay Classic Stampin' Pad
* Crushed Curry Classic Stampin' Pad
* Dusty Durango Classic Stampin' Pad
* Soft Suede Classic Stampin' Pad
* Bermuda Bay Stampin' Write marker
* Crushed Curry Stampin' Write marker
* Dusty Durango Stampin' Write marker
* Soft Suede Stampin' Write marker

Accessories & Tools

* Bermuda Bay 1/2" polka-dot grosgrain ribbon: 5"
* Crushed Curry 1/2" polka-dot grosgrain ribbon: 5"
* Dusty Durango 1/2" polka-dot grosgrain ribbon: 10"
* Soft Suede 1/2" polka-dot grosgrain ribbon: 5"
* Pewter Build-a-Brad
* Crystal Effects
* Color Spritzer Tool
* Spiral punch
* 1/16" Circle punch
* 1/2" Circle punch
* Sanding blocks

*Please Note: Your monogram may require a smaller or larger piece of paper than indicated here.
Instructions

1. Notch left edge of Naturals Ivory card stock (5-1/4" x 5-1/4") using Spiral punch. Cover front of Art Journal with card stock, sliding spiral binding of journal into punched notches. Sand edges smooth.
2. Stamp Extreme Elements images in In Color ink on journal.
3. Ink greeting using Stampin' Write markers, and stamp on journal. Stamp frame image in Soft Suede ink around greeting. Stamp star image in Dusty Durango ink at bottom of frame.
4. Adhere Dusty Durango Designer Series paper to journal, along right edge, and distress using sanding block. Stamp Extreme Elements image in Soft Suede ink along edge.
5. Distress Bermuda Bay Designer Series paper and The Write Stuff Specialty Designer Series paper strips using sanding blocks, and adhere to journal.
6. Cover monogram with The Write Stuff Specialty Designer Series paper, and sand edges smooth. Adhere to journal over Extreme Elements images.
7. Spatter Soft Suede ink over journal using Color Spritzer Tool and Stampin' Write marker.
8. Cover star image with bubble from Build-a-Brad using Crystal Effects.
9. Stamp star image in Bermuda Bay ink on Naturals Ivory card stock, and punch out using 1/2" Circle punch. Insert into Build-a-Brad base, and secure bubble cover using Crystal Effects.
10. Punch hole in one end of Dusty Durango 1/2" polka-dot grosgrain ribbon using 1/16" Circle punch, and secure custom star brad to ribbon.
11. Cover chipboard circle with The Write Stuff Specialty Designer Series paper, and sand edges smooth. Adhere to back side of ribbon, behind custom star brad.
12. Tie other end of Dusty Durango ribbon to top spiral of journal binding. Trim both ends at an angle.
13. Tie other In Color polka-dot grosgrain ribbon pieces to spiral binding, and trim ends at an angle.


Stampin’ Up! 2009

Beware Pirates Favour


Stamps

* Beware Pirates
(set of 5; item 115187; $35.95)

Paper

* Naturals Ivory card stock: three at 2" x 2-3/4"; 2-1/2" x 1"; 4" x 1"
* Soft Suede textured card stock: 6" x 12"; 3" x 5-1/4"
* Dusty Durango Patterns Designer Series paper: 10-1/4" x 3/4"

Ink

* Bermuda Bay Classic Stampin' Pad
* Dusty Durango Classic Stampin' Pad
* Soft Suede Classic Stampin' Pad

Accessories & Tools

* Crushed Curry 1/2" polka-dot grosgrain ribbon: 12"
* Clear Rhinestone brads
* Stampin' Dimensionals
* 1-1/4" Circle punch
* 3/16" Corner Rounder punch
* Sanding blocks
* Sizzix Big Shot
* Box #2 Bigz XL die
* Bamboo skewer

Instructions

1. Create box from Soft Suede textured card stock (6" x 12") using Big Shot machine and Box #2 Bigz XL die.
2. Round corners of Soft Suede textured card stock piece (3" x 5-1/4") using 3/16" Corner Rounder punch, and adhere to top of box to create treasure chest favour.
3. Distress Dusty Durango Patterns Designer Series paper using sanding block. Wrap paper around bottom of favour, and adhere.
4. Tie Crushed Curry 1/2" polka-dot grosgrain ribbon around favour so that ends of ribbon knot at top.
5. Stamp pirate image three times on Naturals Ivory card stock (2" x 2-3/4" each), in Bermuda Bay, Dusty Durango, and Soft Suede.
6. Punch circle from Dusty Durango image (over skull portion of image). Adhere circle to Bermuda Bay image using Stampin' Dimensionals.
7. Cut pirate skull and "X" from Soft Suede image. Remove rhinestone from Clear Rhinestone brad, and adhere over skull's eye. Adhere to Dusty Durango circle using Stampin' Dimensionals.
8. Tear edges of Bermuda Bay image, and adhere to favour using Stampin' Dimensionals.
9. Cut off pointy end of skewer, and cut skewer down to 5".
10. Stamp "Beware pirates" in Dusty Durango ink on Naturals Ivory card stock (4" x 1").
11. Stamp "Beware pirates" in Bermuda Bay ink on Naturals Ivory card stock (2-1/2" x 1"). Cut out "B" portion of image, and adhere over Dusty Durango "B".
12. Cut notch in right end of "Beware pirates" piece to create flag. Trim image in waves, and lightly curl in opposite directions around pencil to make the flag ripple.
13. Wrap left end of flag around bamboo skewer, and adhere.
14. Wrap prongs of Clear Rhinestone brad around top of flag.
15. Stick flag in favour.

Stampin’ Up! 2009

My friend Tanya ia amazing!!!!!!!!!!!!

BRING THINGS INTO BALANCE WITH REIKI (Offered to Women Only)

Certified Level II Reiki practitioner, I offer 1-hour personal treatments using a combination of the following:

Reiki – restoring your vital energy. A treatment feels like a wonderful glowing radiance that flows through and around you. Reiki treats the whole person including body, emotions, mind and spirit creating many beneficial effects that include relaxation and feelings of peace, security and wellbeing.

Coming Sept 19 Omni Technique – Omni Healing is a unique magnified system of energy healing and is a very powerful and advanced system of Reiki (Universal Energy).

Ceragem Massage Bed – Ceragem combines Eastern health techniques handed down from generation to generation with the most scientifically advanced medical breakthroughs of today. This is a massage bed that uses jade rollers and infrared heat to relieve sore muscles and improve circulation and body alignment.

Evening and Weekend appointments available. To book a personalized treatment, contact Tanya at (250) 818-4134 $25 for an hour treatment

Big Shot Tips

I got this information from Patty's blog- she is the best....

Following are the size of papers needed for Stampin'Up! Big Shot dies:

Top Note - 4-1/4" x 5-1/4"
Petal Card - 4-3/4" square
Scallop #2 - 5" x 5"
Oval Scallop - 5" x 5-1/2"
Scallop - 5" x 5"
Envelope - 4-1/2" x 5-1/4" Can be made larger as well...
Lattice - 3-1/2" square
Scallop Square - 5" x 9" for folded card, 5"x5" for square
Rollodex - 3" x 4-1/4"
Clear Flower - 4-3/4" square
Clear Circle - 4-1/2" square
Two Tags - 5-1/4" x 5"
Butterfly - cut at 10"x 5-1/4" and FOLDED in 1/2
Daisies #2 - 5" x 5-1/4"
Snowflake - 4-1/4" x 4-1/2"
Ovals - 4-1/4" x 5-1/4"
Tags - 5" x 4-1/4"
Circles - 4-1/4" x 5"
Leaves #2 - 4-1/2" x 5-1/4"
Decorative Accent - 5-1/4" x 5"
Tulipe - 4-3/4" x 5"

Bigz XL dies - 6"x12", except the Flower Folds and the MatchBox die - see me for cutting instructions.

Saturday, 15 August 2009

Hostess Promotion September 1-November 30, 2009

We're excited to bring you this sweet deal for hostesses September through November:

  • Host a workshop totaling $330 or more and choose any one item* from the 2009 Holiday Mini Catalogue for only $14!
    *Offer excludes hostess sets and My Digital Studio.

After My Digital Studio is released, this offer will become even sweeter:

  • Host a workshop of at least $525 and get My Digital Studio for 50 percent off the retail price (retail price: $106.95; promotional price: $53.47)!

We are thrilled to bring you this very exciting hostess promotion. Start planning your Holiday Mini workshops today!

Thursday, 13 August 2009

Domiknitrix Slink

This is for me!!! See details here...

So it is too big! What a learning curve this has been… ummm not too big I cannot live with it but not loving it either as it stretches through the day. Have to think on this one… you can see from the original pattern the ribbed area (L) is supposed to just under and framing the girls… hmmm I am a bit off LOL Still debating frogging or settling… ___________________________________________

I am just sewing up now… What a lot of confusion and errors… I think it would have looked better if I had not had to redo parts so many times. I hope I love it as much as I had hoped and the flaws do not bug me too much. I think the neckline in the photo was done differently than the pattern (a variation that they did not instruct) and I liked it better… oh well, not so hard on myself - now wear it :) I am also smaller than the size I made but sizing is something I will get better at as I go too…
______________________________________________

I took a picture of my pattern book until I can get my own up here… just so my mom can see what it looks like - or is supposed to anyway! :)
I have to say I love knitting on circular needles. This pattern is fun because you are knitting it sideways and you can see what it looks like as you go… I know there are small flaws but I am very proud of my progress for my 4th project and only second sweater. The yarn is beautiful!! Of course you cannot see that online but it is soft and a bit of shine and just feels and works nice!
I am at the stage currently where I am doing the sleeves and neck - the basic shell is complete. The nicest part was the lack of sewing up :) Note- look for changes to pattern if you do this as there were a lot of them and I am glad as a newbie I found them before I made boo boos… Even after I looked up changes on here I found more and adjusted… I love love love this sweater!

Monday, 10 August 2009

Decor Elements Tray - Shadow Effect


I really wanted to try a look similar to this one from the Stampin' Up! Catalogue with the new Decor Elements line, but more subtle and in my favourite colours... Hope you like it! I am not unfortunately the best photographer nor is my place set up for good photos so I hope you can see the effect!