Wednesday, 9 September 2009

Stampin’ Up!®’s new My Digital Studio scrapbooking


Coming soon....

The brand new digital solutions program called My Digital Studio, by Stampin' Up!, will be available to customers on Oct. 1st. Stampin’ Up!®’s new My Digital Studio scrapbooking and card making software opens a whole new world of opportunities for your crafting needs! I will not be able to purchase the full program immediately as I am in need of budgeting a new computer first but plan to utilize the digital downloads immediately and go from there. Many of you know that hybrid scrapping is my favourite and this is very exciting!


CREATIVITY WITH STAMPIN’ UP!® GOES DIGITAL—INTRODUCING MY DIGITAL STUDIO™

Stampin’ Up!’s award-winning artwork, colors, and accessories available in digital format via My Digital Studio

Stampin’ Up!®, long known for its exclusive rubber stamps and accessories for paper crafting, scrapbooking and home décor, is venturing into the digital age with the release of My Digital Studio™. My Digital Studio is an easy-to-use, software-based design studio featuring thousands of Stampin’ Up!’s award-winning images, colors, and accessories.

Extremely intuitive, My Digital Studio allows crafters of all skill levels to easily navigate the program and design their own digital project or use hundreds of templates to create professionally designed cards, photo albums, scrapbooks, and more. New artwork and templates will be available on a regular basis for download via Stampin’ Up!’s Online Store. In addition, My Digital Studio will offer professional print services where customers can purchase bound photo albums, cards, individual scrapbook pages, and calendars.

“I love the way My Digital Studio combines what Stampin’ Up! is known for—exclusive images, terrific color coordination and inspiring project ideas—and offers it in a digital format,” said Shelli Gardner, Stampin’ Up! cofounder and CEO. “This will make it easier than ever before to scrapbook or create other paper crafting projects while still ensuring that your end result looks great!”

The design studio offers perfect coordination when embellishing digital output products with traditional Stampin’ Up! embellishments, as well. Users can produce exquisite, multi-dimensional projects that marry the ease of digital with the beauty of handcrafted projects, creating what are known as hybrid projects.

Offering its products in a digital format with My Digital Studio is an extension to Stampin’ Up!’s product offerings and not a replacement of the traditional paper crafting products. Stampin’ Up! will continue to deliver innovative products to its customers and demonstrators via the traditional format.

Watch for upcoming demonstrations and ideas...


About Stampin’ Up!
Stampin’ Up!, a 21-year old, multi-million dollar direct-sales company, offers an exclusive line of decorative stamp sets and accessories for home décor, greeting cards, craft projects, and scrapbooking. Currently, tens of thousands of demonstrators from the United States, Australia, New Zealand, Canada, France, Germany and the United Kingdom teach the art of stamping. Stampin’ Up! operates two state-of-the-art facilities including an 80,000-square-foot manufacturing plant in Kanab, Utah; and a 300,000-square-foot corporate office, distribution center, and demonstrator support call center in Riverton, Utah. For more information call 801.257.5329 or visit www.stampinup.com.

Tuesday, 8 September 2009

Stenciled Album


Paper

* More Mustard card stock
* Rich Razzleberry card stock
* Very Vanilla card stock
* Thoroughly Modern Designer Series paper
* On Board 8-1/2" x 8-1/2" Album

Ink

* More Mustard Craft Stampin' Pad

Accessories & Tools

* Rich Razzleberry 1/2" polka-dot grosgrain ribbon
* Flourish Décor Stencil
* Styled Silver Hodgepodge Hardware
* Stampin' Dimensionals
* Sizzix Big Shot
* Beautiful Butterfly Bigz die
* Sponge daubers

Stampin'Up! 2009

Vintage Candy Boxes


Chocolate Chip Box
Stamps

* Oval All
(set of 4; 113790; $22.95)

Paper

* Very Vanilla card stock: 3" x 3"
* Blush Blossom textured card stock: 3" x 3"
* Chocolate Chip textured card stock: 6" x 6"; 6" x 12"

Ink

* Chocolate Chip Classic Stampin' Pad
* Close to Cocoa Stampin' Write marker

Accessories & Tools

* Chocolate Chip 5/8" grosgrain ribbon
* Very Vanilla 3/8" taffeta ribbon;
* Pretties Kit
* Stampin' Dimensionals
* Color Spritzer Tool
* Large Oval punch
* Scallop Oval punch
* Sizzix Big Shot
* Tulipe Bigz die
* Matchbox Bigz XL die
* Crochet thread

Very Vanilla Box
Stamps

* Friends 24-7
(set of 6; 113218; $34.95)

Paper

* Very Vanilla card stock: 6" x 6"; 6" x 12"
* Blush Blossom textured card stock: 3" x 3"
* Chocolate Chip textured card stock: 3" x 3"

Ink

* Chocolate Chip Classic Stampin' Pad
* VersaMark Pad

Accessories & Tools

* Silver Stampin Emboss powder
* Dazzling Diamonds Stampin' Glitter
* Chocolate Chip 3/8" taffeta ribbon
* Styled Silver Hodgepodge Hardware
* Pretties Kit
* Stampin' Dimensionals
* Heat tool
* Scallop Edge punch
* 1" Circle punch
* Sizzix Big Shot
* Matchbox Bigz XL die

Blush Blossom Box
Stamps

* Dreams du Jour
(set of 4; 111624; $24.95)
* Bella Toile background stamp
(111598; $23.95)

Paper

* Very Vanilla card stock: 3" x 3"
* Blush Blossom textured card stock: 6" x 6"; 6" x 12"
* Chocolate Chip textured card stock: 3# x 3#

Ink

* Close to Cocoa Classic Stampin' Pad
* VersaMark pad
* Close to Cocoa Stampin' Write marker

Accessories & Tools

* White Stampin' Emboss powder
* Pretties Kit
* Autumn Harvest Rub-Ons
* Stampin' Dimensionals
* Color Spritzer Tool
* Heat tool
* Trio Flower punch
* Sizzix Big Shot
* Matchbox Bigz XL die

Instructions
Chocolate Box

1. Cut the unassembled matchbox from Chocolate Chip textured card stock (6" x 12") using Big Shot machine and Matchbox die.
2. Assemble the two separate portions of matchbox.
3. Cut Tulipe from Chocolate Chip textured card stock (6" x 6") using Big Shot machine and Tulipe die. Cut off flourish.
4. Adhere flourish to the slip-cover portion of matchbox.
5. Wrap Chocolate Chip 5/8" grosgrain ribbon around top of slip-cover.
6. Wrap Very Vanilla 3/8" taffeta ribbon over the Chocolate Chip 5/8" grosgrain ribbon, and tie the ends together using crochet thread.
7. Punch scalloped oval from Blush Blossom textured card stock using Scallop Oval punch.
8. To create label: Stamp best wishes image in Chocolate Chip ink on Very Vanilla textured card stock, and punch out using Large Oval punch. Adhere to Blush Blossom scalloped oval.
9. Adhere label to slip-cover using Stampin' Dimensionals.
10. Adhere half-back pearls to label and ribbon.
11. Slide slip-cover over box portion of matchbox.
12. Spatter ink over the box using Close to Cocoa Stampin' Write marker and Color Spritzer Tool

Very Vanilla Box

1. Cut the unassembled matchbox from Very Vanilla textured card stock (6" x 12") using Big Shot machine and Matchbox die.
2. Assemble the two separate portions of matchbox.
3. Cut 1-3/4"-wide strip from Blush Blossom textured card stock, and stamp fleur de lis image on card stock in VersaMark ink.
4. Apply Silver Stampin' Emboss Powder to stamped image, shake off excess, and heat emboss.
5. Apply Dazzling Diamonds Stampin' Glitter to ends of flourishes.
6. Wrap embossed Blush Blossom card stock around slip-cover, and adhere.
7. Punch scalloped border strips from Chocolate Chip textured card stock using Scallop Edge punch; trim and adhere to slip-cover portion of matchbox so that the strips border the Blush Blossom card stock.
8. Punch circle from Very Vanilla textured card stock using 1" Circle punch.
9. To create label: Stamp "Here for you" in Chocolate Chip ink on Very Vanilla textured cardstock and insert punched circle in Styled Silver Hodgepodge Hardware.
10. Tie Chocolate Chip 3/8" taffeta ribbon to silver hardware and wrap ribbon around slip-cover.
11. Remove rhinestone from brad, and adhere to silver hardware, and then silver hardware to slip-cover.
12. Run Blush Blossom textured card stock through crimper and cut several strips from crimped card stock. Insert strips into box portion.
13. Slide slip-cover over box portion of matchbox.

Blush Blossom Box

Box

1. Cut the unassembled matchbox from Blush Blossoms textured card stock (6" x 12") using Big Shot machine and Matchbox die.
2. Stamp toile image in VersaMark ink on slip-cover.
3. Apply White Stampin' Emboss powder to stamped image, shake off excess, and heat emboss.
4. Assemble the two separate portions of matchbox.
5. Cut 1/2" strip from Chocolate Chip textured card stock and dab with water to distress. Adhere strip to the slip-cover.
6. Adhere hat pin from Pretties Kit over Chocolate Chip strip using Glue Dots. Trim pin with wire cutters, if needed.
7. To create label: Cut label from Very Vanilla textured card stock using Big Shot machine and Matchbox die. Spatter ink over label using Close to Cocoa Stampin' Write marker and Color Spritzer Tool. Apply Rub-On greeting to label.
8. Adhere label to slip-cover using Stampin' Dimensionals.
9. Stamp butterfly image in Close to Cocoa ink to Very Vanilla textured card stock. Cut out image and adhere to edge of label.
10. Adhere label to slip-cover.
11. Slide slip-cover over box portion of matchbox.

Candy Wrappers

1. Cut four 1"-wide strips from Chocolate Chip textured card stock. Wrap around candy and adhere.
2. Punch four flowers from Blush Blossom textured card stock using Trio Flowers punch. Adhere to Chocolate Chip strips.
3. Adhere half-back pearls to punched flowers.
4. Insert candy into box.

Stampin'Up! 2009

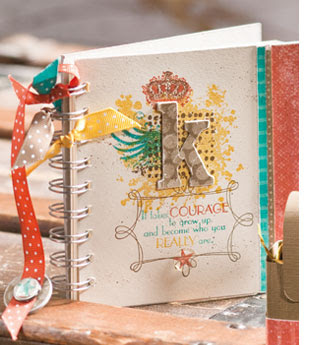
Courage Journal


Courage Journal

Stamps

* Extreme Elements
(set of 6; item 115181; $35.95)
* Gallery
(set of 3; item 113776; $30.95)
* Hope Happens
(set of 5; item 113722; $26.95)

Paper

* Naturals Ivory card stock: 1-1/2" x 1-1/2"; 5-1/4" x 5-1/4"
* Bermuda Bay Patterns Designer Series paper: 1/8" x 5-1/4"
* Dusty Durango Patterns Designer Series paper: 1-1/4" x 5-1/4"
* The Write Stuff Specialty Designer Series paper: 1-1/4" x 1-1/4"; 3" x 3" (monogram*); 5-1/4" long strip
* On Board 5" x 5" Art Journal
* On Board Loads of Letters
* On Board Essentials

Ink

* Bermuda Bay Classic Stampin' Pad
* Crushed Curry Classic Stampin' Pad
* Dusty Durango Classic Stampin' Pad
* Soft Suede Classic Stampin' Pad
* Bermuda Bay Stampin' Write marker
* Crushed Curry Stampin' Write marker
* Dusty Durango Stampin' Write marker
* Soft Suede Stampin' Write marker

Accessories & Tools

* Bermuda Bay 1/2" polka-dot grosgrain ribbon: 5"
* Crushed Curry 1/2" polka-dot grosgrain ribbon: 5"
* Dusty Durango 1/2" polka-dot grosgrain ribbon: 10"
* Soft Suede 1/2" polka-dot grosgrain ribbon: 5"
* Pewter Build-a-Brad
* Crystal Effects
* Color Spritzer Tool
* Spiral punch
* 1/16" Circle punch
* 1/2" Circle punch
* Sanding blocks

*Please Note: Your monogram may require a smaller or larger piece of paper than indicated here.
Instructions

1. Notch left edge of Naturals Ivory card stock (5-1/4" x 5-1/4") using Spiral punch. Cover front of Art Journal with card stock, sliding spiral binding of journal into punched notches. Sand edges smooth.
2. Stamp Extreme Elements images in In Color ink on journal.
3. Ink greeting using Stampin' Write markers, and stamp on journal. Stamp frame image in Soft Suede ink around greeting. Stamp star image in Dusty Durango ink at bottom of frame.
4. Adhere Dusty Durango Designer Series paper to journal, along right edge, and distress using sanding block. Stamp Extreme Elements image in Soft Suede ink along edge.
5. Distress Bermuda Bay Designer Series paper and The Write Stuff Specialty Designer Series paper strips using sanding blocks, and adhere to journal.
6. Cover monogram with The Write Stuff Specialty Designer Series paper, and sand edges smooth. Adhere to journal over Extreme Elements images.
7. Spatter Soft Suede ink over journal using Color Spritzer Tool and Stampin' Write marker.
8. Cover star image with bubble from Build-a-Brad using Crystal Effects.
9. Stamp star image in Bermuda Bay ink on Naturals Ivory card stock, and punch out using 1/2" Circle punch. Insert into Build-a-Brad base, and secure bubble cover using Crystal Effects.
10. Punch hole in one end of Dusty Durango 1/2" polka-dot grosgrain ribbon using 1/16" Circle punch, and secure custom star brad to ribbon.
11. Cover chipboard circle with The Write Stuff Specialty Designer Series paper, and sand edges smooth. Adhere to back side of ribbon, behind custom star brad.
12. Tie other end of Dusty Durango ribbon to top spiral of journal binding. Trim both ends at an angle.
13. Tie other In Color polka-dot grosgrain ribbon pieces to spiral binding, and trim ends at an angle.


Stampin’ Up! 2009

Beware Pirates Favour


Stamps

* Beware Pirates
(set of 5; item 115187; $35.95)

Paper

* Naturals Ivory card stock: three at 2" x 2-3/4"; 2-1/2" x 1"; 4" x 1"
* Soft Suede textured card stock: 6" x 12"; 3" x 5-1/4"
* Dusty Durango Patterns Designer Series paper: 10-1/4" x 3/4"

Ink

* Bermuda Bay Classic Stampin' Pad
* Dusty Durango Classic Stampin' Pad
* Soft Suede Classic Stampin' Pad

Accessories & Tools

* Crushed Curry 1/2" polka-dot grosgrain ribbon: 12"
* Clear Rhinestone brads
* Stampin' Dimensionals
* 1-1/4" Circle punch
* 3/16" Corner Rounder punch
* Sanding blocks
* Sizzix Big Shot
* Box #2 Bigz XL die
* Bamboo skewer

Instructions

1. Create box from Soft Suede textured card stock (6" x 12") using Big Shot machine and Box #2 Bigz XL die.
2. Round corners of Soft Suede textured card stock piece (3" x 5-1/4") using 3/16" Corner Rounder punch, and adhere to top of box to create treasure chest favour.
3. Distress Dusty Durango Patterns Designer Series paper using sanding block. Wrap paper around bottom of favour, and adhere.
4. Tie Crushed Curry 1/2" polka-dot grosgrain ribbon around favour so that ends of ribbon knot at top.
5. Stamp pirate image three times on Naturals Ivory card stock (2" x 2-3/4" each), in Bermuda Bay, Dusty Durango, and Soft Suede.
6. Punch circle from Dusty Durango image (over skull portion of image). Adhere circle to Bermuda Bay image using Stampin' Dimensionals.
7. Cut pirate skull and "X" from Soft Suede image. Remove rhinestone from Clear Rhinestone brad, and adhere over skull's eye. Adhere to Dusty Durango circle using Stampin' Dimensionals.
8. Tear edges of Bermuda Bay image, and adhere to favour using Stampin' Dimensionals.
9. Cut off pointy end of skewer, and cut skewer down to 5".
10. Stamp "Beware pirates" in Dusty Durango ink on Naturals Ivory card stock (4" x 1").
11. Stamp "Beware pirates" in Bermuda Bay ink on Naturals Ivory card stock (2-1/2" x 1"). Cut out "B" portion of image, and adhere over Dusty Durango "B".
12. Cut notch in right end of "Beware pirates" piece to create flag. Trim image in waves, and lightly curl in opposite directions around pencil to make the flag ripple.
13. Wrap left end of flag around bamboo skewer, and adhere.
14. Wrap prongs of Clear Rhinestone brad around top of flag.
15. Stick flag in favour.

Stampin’ Up! 2009

My friend Tanya ia amazing!!!!!!!!!!!!

BRING THINGS INTO BALANCE WITH REIKI (Offered to Women Only)

Certified Level II Reiki practitioner, I offer 1-hour personal treatments using a combination of the following:

Reiki – restoring your vital energy. A treatment feels like a wonderful glowing radiance that flows through and around you. Reiki treats the whole person including body, emotions, mind and spirit creating many beneficial effects that include relaxation and feelings of peace, security and wellbeing.

Coming Sept 19 Omni Technique – Omni Healing is a unique magnified system of energy healing and is a very powerful and advanced system of Reiki (Universal Energy).

Ceragem Massage Bed – Ceragem combines Eastern health techniques handed down from generation to generation with the most scientifically advanced medical breakthroughs of today. This is a massage bed that uses jade rollers and infrared heat to relieve sore muscles and improve circulation and body alignment.

Evening and Weekend appointments available. To book a personalized treatment, contact Tanya at (250) 818-4134 $25 for an hour treatment

Big Shot Tips

I got this information from Patty's blog- she is the best....

Following are the size of papers needed for Stampin'Up! Big Shot dies:

Top Note - 4-1/4" x 5-1/4"
Petal Card - 4-3/4" square
Scallop #2 - 5" x 5"
Oval Scallop - 5" x 5-1/2"
Scallop - 5" x 5"
Envelope - 4-1/2" x 5-1/4" Can be made larger as well...
Lattice - 3-1/2" square
Scallop Square - 5" x 9" for folded card, 5"x5" for square
Rollodex - 3" x 4-1/4"
Clear Flower - 4-3/4" square
Clear Circle - 4-1/2" square
Two Tags - 5-1/4" x 5"
Butterfly - cut at 10"x 5-1/4" and FOLDED in 1/2
Daisies #2 - 5" x 5-1/4"
Snowflake - 4-1/4" x 4-1/2"
Ovals - 4-1/4" x 5-1/4"
Tags - 5" x 4-1/4"
Circles - 4-1/4" x 5"
Leaves #2 - 4-1/2" x 5-1/4"
Decorative Accent - 5-1/4" x 5"
Tulipe - 4-3/4" x 5"

Bigz XL dies - 6"x12", except the Flower Folds and the MatchBox die - see me for cutting instructions.